Ever wonder what life is like when you become a blogger?
Really you don't think much will change.
But it does.
Social Media - becomes your bff. Literally you are all over it. Keeping up with the people you follow and posting your own things. Conversations that make you laugh and ones that make you cry {good way people}.
Comments & e-mails - happen quite often. You are commenting on other blogs. Your readers are leaving comments for you. E-mails start rolling in and before you know it your inbox looks like a disaster. But it's fun. ;)
Pictures - oh lord. You take pictures of everything right down to snapping a picture of yourself before you go to bed and posting it. You start learning how to take "proper" pictures and edit them. Your significant other and/or children start looking at you like your crazy because you just took a picture of a burger and fries. Well, your instagram peeps had to see it of course.
You blog - You write your own blog posts how ever often you like and guest post for others. Scheduling posts ahead of time and writing down post ideas.
Inspiration - Your inspiration goes into over drive because now you have to make this and share it with your lovely followers because well they just have to see it and possibly make it themselves.
Caught up - you can get caught up in the land of blogging so us bloggers try and keep this in check. it's a hard line to walk but we somehow manage.
Really - you find yourself doing things or noticing things you normally wouldn't and you want to share it, blog about it, snap a picture of it.
What has changed sense YOU became a blogger?


Wednesday, June 27, 2012
Tuesday, June 26, 2012
Five Tips on Tuesday - Descriptions
Today I wanted to venture into the land of describing your items.
Let's be honest. I'm more inclined to buy something handmade when the description is detailed and catchy.
For instance, this to me is no fun and doesn't really catch my attention:
Pink heart necklace.
Sterling silver chain.
24" long.
Ships in 2 days.
Okay awesome. You gave me what I wanted to know.
But sense it is handmade I want to know more.
I want to know why you made it. I did an etsy lab that talked about telling a story with your description.
That's a great idea if you can tell a story and one I highly agree with.
But maybe you don't have a story.
But you made it for a reason.
So tell us why. I pulled this straight from my shop.
"I designed this necklace because It is something I believe in. It also comes from my favorite scripture. "For we walk by faith, not by sight." 2 Corinthians 5.7
- This necklace has one metal disc with the words walk by faith stamped on it with a small cross in the corner.
- The chain is silver plated and is 18" long.
- The necklace will ship within 2-3 days after purchase has been made and payment has been received."
I told you why I designed it in the first place.
Then I gave you the details.
That's what I like to see. :)
So next time you are trying to figure out how to describe your items. Thinks about these five tips.
- Why did you design it? Did you make it for a dear friend, family member, loved one? Is it a favorite bible verse or you loved the way the fabrics blended together?
- Tell a story with it. Paint a picture of the item that just captures the buyer and makes them want to own that product.
- Be detailed. What kind of chain it is. Fabric. Yarn. What size it is. As a buyer I want to know these things.
- Let the buyer know how long it's going to take to ship. If i need something buy the end of the week and it takes 5 days to ship I need to know that before buying it.
- Name your product. Seriously - have fun with it. I actually need to change a few of these my self. For instance red rose ring doesn't sound near as cute as put a ring on it - rose style. and yes that is beyonce's song put a ring on it. hehe.
Simple as that.
And have fun with it.
Monday, June 25, 2012
Shop products update
Blah. I know.
This is the second Monday in a row that I haven't had new products added to the shop!
Well, there is a reason.
Because next Monday I am having a ton of products to the shop - all brand.spankin.new.

& I want to say hello to all of my new followers!
I am so happy to have you here!
To learn more about this blog you can check that out here.
Happy Monday yall!
This is the second Monday in a row that I haven't had new products added to the shop!
Well, there is a reason.
Because next Monday I am having a ton of products to the shop - all brand.spankin.new.
& I want to say hello to all of my new followers!
I am so happy to have you here!
To learn more about this blog you can check that out here.
Happy Monday yall!
Thursday, June 21, 2012
Tutorial Thursday - blog layout
So you have this super cute header {This tutorial can be used for a blog header as well} but want the rest of your blog to match the colors. I'm about to show you a super quick and easy way to do this.
Login & click on your blog name. {this is using the new blogger interface}
 Then proceed to click on Template. {On the left side bar}

One the template you have pops up click on customize.

Then click on advanced & wa - la start changing colors.

Just go through all of the links between the two blue lines I have put in the next picture and change the colors however you want them and to your liking. One your done click apply to blog in the top right corner.

That's it! Now you have pretty colors to match your pretty header! :)
Login & click on your blog name. {this is using the new blogger interface}
One the template you have pops up click on customize.
Then click on advanced & wa - la start changing colors.
Just go through all of the links between the two blue lines I have put in the next picture and change the colors however you want them and to your liking. One your done click apply to blog in the top right corner.
That's it! Now you have pretty colors to match your pretty header! :)
Wednesday, June 20, 2012
How to use passionfruit ads
I highly recommend if you are going to offer ads on your blogs to use passionfruit ads. It is so much more organized! It is also super easy to set up & I'm about to show you how. For the record I don't use passionfruit on here right now because I don't have ad spots yet but I use it on my other blog and that is the blog name you are seeing in the pictures below {Live.Laugh.L0ve.}
Sign up if you haven't already and then go ahead and sign in.

Click on my sites & add a new site. Then proceed to fill in the info!


You will then have a dashboard where it shows your basic things. Click on your site name on the right.

You will be directed to another page where you will see more things in detail and be able to start putting your ad spots together and accept ad spots.

To create an ad size. Click on site setup and the top of the screen and then click on define ad spot.

Click on ad a spot. Then fill out all of the information and save ad spot. Do this for each ad space you would like to offer.


Then click on your ad shop at the top of the page and copy the code and place it on your sponsor page so people can purchase and ad.

Then click on Displaying ads and copy each code and put the codes in your sidebar.

You can create promo codes by clicking on site setup - promo codes. Ad promo code.

You can view all ad details by clicking on ads at the top of the page and you can view all payment history by clicking on Cash Money.

And not only is it super easy. Jason is super helpful, so if you get lost or need help still don't be afraid to ask him! Now - go set up your passionfruit ads and start selling! :)
Sign up if you haven't already and then go ahead and sign in.
Click on my sites & add a new site. Then proceed to fill in the info!
You will then have a dashboard where it shows your basic things. Click on your site name on the right.
You will be directed to another page where you will see more things in detail and be able to start putting your ad spots together and accept ad spots.
To create an ad size. Click on site setup and the top of the screen and then click on define ad spot.
Click on ad a spot. Then fill out all of the information and save ad spot. Do this for each ad space you would like to offer.
Then click on your ad shop at the top of the page and copy the code and place it on your sponsor page so people can purchase and ad.
Then click on Displaying ads and copy each code and put the codes in your sidebar.
You can create promo codes by clicking on site setup - promo codes. Ad promo code.
You can view all ad details by clicking on ads at the top of the page and you can view all payment history by clicking on Cash Money.
And not only is it super easy. Jason is super helpful, so if you get lost or need help still don't be afraid to ask him! Now - go set up your passionfruit ads and start selling! :)
Tuesday, June 19, 2012
Five Tips on Tuesday - Pictures
Today I wanted to reveal my secret about pictures. Before you run away you don't have to have a fancy super awesome camera for this. In fact I take all of my pictures on my cell phone. Yes you read that right - my android cell phone is where all the picture taking action goes down. While I wish I did have a fancy super awesome camera, I don't so I learned how to use my phone camera the best I could. I'm going to share a few tips with yall today!
For up close pictures use the manual button. Auto just doesn't always cut it and you can't take a picture like the one below on your phone on auto - at least you can't on my phone.


Snap it near a window. Natural lighting is the best lighting. If you can't go outside or don't want to - take your pictures near a window. Let that natural light stream through.

Point and shoot from far away using the sun. Line up your camera with the person or object farthest from you. Get your camera as close to the closest person or object that you can. Then start raising your camera higher and angling it down until the sun catches just right, then click!
2.jpg)
I used no special effects to get the water droplets. That was all point and shoot from a distance.
Point and shoot from closeup using the sun. For a close up. Focus on the object or person farthest from you {which shouldn't be to far} Get eye level with whatever or whoever you are taking a picture of and click. Angle your camera just slightly until you can tell the sun is having an affect on the picture and then click! This is what you get.

Again no special effects done to this. This was simply point and shoot.
Saturday, June 16, 2012
Showcase Saturday - Gussy Sews

I have mentioned Gussy before on this little blog. She is the one who gave me the inspiration to have new shop items each week. Actually she inspires me quite a bit. Her blog is extremely motivating and I just love her as a person! She is honest and kind-hearted and incredibly talented. I hope to one day have her as my mentor.
Gussy literally sews some of the most adorable ruffly products I have ever seen!! I own one of her wristlets and I love it! As a matter of fact I believe I need this one as well!

I mean really. Look at those colors!! Hello beautiful! I also want this large zip pouch.

I am in love with blue and orange right now. She really does do beautiful work!!
Speaking blue. I need this wallet. Right.now.

BLUE COLOR BOMB WALLET
Look at the pure beauty of this wallet! Ruffles - check. Button closer - check. Beautiful colors - check. I really don't think a wallet gets any cuter or more perfect that that!
Now you have seen just how talented Gussy is and you know you are drooling over these products! Go check out her shop and get your shop on and then follow her blog because she truly is wonderful!
Friday, June 15, 2012
Blogging 101 - Sponsors part 2
Okay - so you know what you want to offer.
You have sponsors weather you asked or the flocked to you.
Now what do you do?
Do everything you say you're going to. If you say your going to give social media shoutouts - do it. If you are allowing your sponsors to guest post - let them. Don't say you are giving your sponsors something and then not following through with it. No one likes that at all.
Sponsor other blogs. I am definitely not going to tell you that the other blogs you sponsor need to be bigger bloggers because that's not always true. This is what I can tell you.
- Some of the most traffic I have gotten comes from blogs that are barely bigger than mine. They are smaller so they have more time to promote you, show you off and truly get to know you! So just because you see smaller size numbers, see what they have to offer first it may surprise you.
- Bigger blogs are always great but can be expensive. But I won a giveaway and won a small ad space on Casey's blog and I was apart of her group giveaway & I gained 28 new followers in 2 days. That's not included the followers I gained on twitter from that. So sponsoring big blogs does have it's perks too!
Promote, promote, promote. Show your sponsors off. Blog posts, social media. Let your readers know about them! After all they are paying you to do just that.
Stay in touch. E-mail your sponsors. Get to know them. I have found that I can promote my sponsors much better when I e-mail them and find out things about them. When I follow their blogs and social media sites. It gives me a feel for who they are and in turn I help promote them better!
What advice do you have for sponsoring? Share with me!
Thursday, June 14, 2012
Tutorial Thursday // Creating a button
Today I am going to show you the Nine steps to create a button.
Don't run away because there is nine steps.
I promise it is very easy.
One. Go to picmonkey.com and upload a photo or color of your choice background.

Two. Resize your image to 200x200. {Make sure keep proportions is unchecked.}


Three. Click on frames. Simple Edge. Push thickness on the outer color all the way to the left..

Four. Select the box next to the inner color and choose a color.

Five. Go to shapes. Geometric shapes. Select whatever shape you like - I used the first one. {You do not have to do this step. I just like doing it when I use a picture as a background.}

Six. Choose a color for your shape and place it on your button. Resize it as you need.

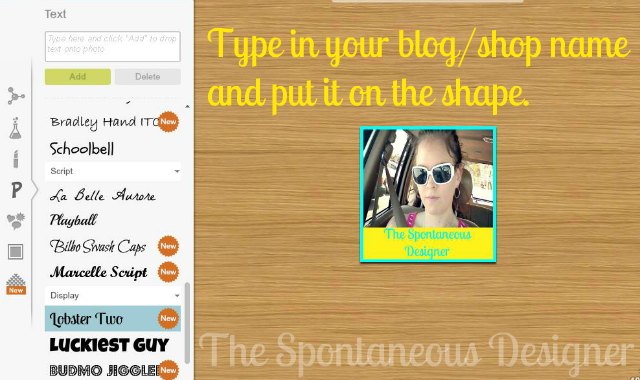
Seven. Click the font tab. Choose a font & a color.
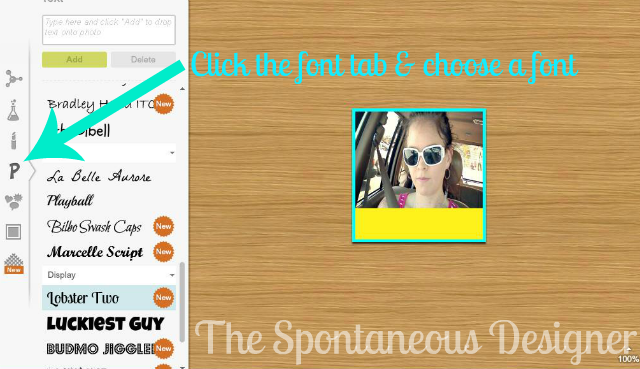
Eight. Type in the name you want on it and place it on your button. {if you are using a shape place it in the shape}
Nine. Go back to the top tab. Click resize. Resize it back to 200x200 {the border made it bigger} and save your button.

TA-DA!! Now you have a blog button!
See really isn't as bad as it seems.
The more you play around with it - the better at it you will get!
Don't run away because there is nine steps.
I promise it is very easy.
One. Go to picmonkey.com and upload a photo or color of your choice background.
Two. Resize your image to 200x200. {Make sure keep proportions is unchecked.}
Three. Click on frames. Simple Edge. Push thickness on the outer color all the way to the left..
Four. Select the box next to the inner color and choose a color.
Five. Go to shapes. Geometric shapes. Select whatever shape you like - I used the first one. {You do not have to do this step. I just like doing it when I use a picture as a background.}
Six. Choose a color for your shape and place it on your button. Resize it as you need.
Seven. Click the font tab. Choose a font & a color.
Eight. Type in the name you want on it and place it on your button. {if you are using a shape place it in the shape}
Nine. Go back to the top tab. Click resize. Resize it back to 200x200 {the border made it bigger} and save your button.
TA-DA!! Now you have a blog button!
See really isn't as bad as it seems.
The more you play around with it - the better at it you will get!
Wednesday, June 13, 2012
Blog 101 - Sponsors Part 1
So, you want to start accepting sponsors on your blog huh?
But you're not sure how or when to start.
Today. I'm here to help you.
There really is no "perfect" time to start accepting sponsors. I would recommend swapping with other blogs that are similar in size first. Just so you get the feel for it. Now if you have already done that but you are ready to upgrade to more than just swapping, I have a few tips for you today.
1. Offer Variety. On my other blog - I have a wide variety of sponsor packages, that way sponsors can pick which size they would like to have out of the options I have instead of just saying "this is the size deal with it." Don't get that confused - if you are strictly a swapper - one size is perfect!

2. Let your sponsors know what they are paying for. This is very important. If I'm spending money on sponsoring a blog - I want to know what they are going to do for me.

3. Be realistic. If you don't have time to promote your sponsors with shoutouts on social media sites, blog posts, or anything else. Don't let them believe you can. Do what you can do - not what other bloggers are doing.
4. Don't be afraid to ask. Asking other bloggers to sponsor you is just part of it. I learned this a little late - but better late than never right?! Last month was the first month I asked other wonderful bloggers to sponsor my little blog & the result was wonderful! I think it's really they just aren't sure or they don't know that you offer sponsorship. It might be awkward but it works.
5. Offer a few free ad spaces to bigger bloggers. This is something I have learned. Having those big bloggers on your sidebar actually works. I haven't figured out why yet, but every few months I will offer a big blogger free sponsorship. Keep in mind these are bloggers I have regular contact with and I want to show them off and in return they can see how I do with sponsoring.
But you're not sure how or when to start.
Today. I'm here to help you.
There really is no "perfect" time to start accepting sponsors. I would recommend swapping with other blogs that are similar in size first. Just so you get the feel for it. Now if you have already done that but you are ready to upgrade to more than just swapping, I have a few tips for you today.
1. Offer Variety. On my other blog - I have a wide variety of sponsor packages, that way sponsors can pick which size they would like to have out of the options I have instead of just saying "this is the size deal with it." Don't get that confused - if you are strictly a swapper - one size is perfect!
2. Let your sponsors know what they are paying for. This is very important. If I'm spending money on sponsoring a blog - I want to know what they are going to do for me.

3. Be realistic. If you don't have time to promote your sponsors with shoutouts on social media sites, blog posts, or anything else. Don't let them believe you can. Do what you can do - not what other bloggers are doing.
4. Don't be afraid to ask. Asking other bloggers to sponsor you is just part of it. I learned this a little late - but better late than never right?! Last month was the first month I asked other wonderful bloggers to sponsor my little blog & the result was wonderful! I think it's really they just aren't sure or they don't know that you offer sponsorship. It might be awkward but it works.
5. Offer a few free ad spaces to bigger bloggers. This is something I have learned. Having those big bloggers on your sidebar actually works. I haven't figured out why yet, but every few months I will offer a big blogger free sponsorship. Keep in mind these are bloggers I have regular contact with and I want to show them off and in return they can see how I do with sponsoring.
Tuesday, June 12, 2012
Five tips on Tuesday
I originally posted this on Skye's blog. But I wanted to share it here today.
Today I wanted to share with yall {yes I am from Texas} 5 things I have learned while having a handmade business.
1. It takes time. Lots of time if you want it to be successful. Promoting, working on shop items, editing pictures of your products, writing descriptions, getting your shop out there. I've learned to be very patient with my shop - because it's not going to grow over night, but I know if I put the time and effort into it, it will be worth it.
2. Understand that it's YOUR shop. This is one that got me for the longest time. Don't get me wrong. I obviously knew it was MY shop, but I was trying to go with a theme of things because that's what I saw in other shops. They had a theme and I thought in order for it to be successful that my shop needed a theme. I couldn't have been more wrong. My "theme" is now whatever I create that I fall in love with. Knowing that I don't have to keep it to one certain theme has let my creativity breathe again!
3. Make items you love. You think this would be an obvious one but in the beginning everything I created wasn't something I loved and it showed. I was creating things that I thought would sell. Big mistake. It finally hit me that I needed to be completely smitten with the items in my shop because it wasn't going to show in the way I promoted them and in the work themselves.
4. Believe in yourself and in your shop. If you want others to believe in your shop, you have to believe in it. You have to know this is what you want to do and that you are doing what you love, otherwise how do you expect others to love what you make if they can't see that you do?
5. Spread the word. This is a hard one for me. I'm very shy and asking someone to buy something I make, makes me want to curl into a ball and hide. But truth be told is your shop will get no where if you don't spread the word about. It has to start with YOU. You have to be the one who lights the fire for your shop and then watch it spread and then keep it going. This is something I am going to be doing a lot more.
If you own a handmade business, share with me something you have learned.
Monday, June 11, 2012
New Shop Items {She reads truth necklaces}
Happy Monday yall!
How was everyone's weekend?!
I don't have many new shop items this week but the whole point is to have new one's every week and I love having that goal set. There is three new items in the shop and they are all hand stamped necklaces based on the She Reads Truth soul detox that alot of wonderful bloggers are doing. You can read more about that here.
I wear one of these necklaces everyday and having it around my neck is such a beautiful reminder to myself that I read his word and how much I truly love God.
Small Rectangle She reads truth necklace.
.JPG)
Large rectangle she reads truth necklace.

Circle she reads truth necklace.

That's all for this week!
Have a great day!
How was everyone's weekend?!
I don't have many new shop items this week but the whole point is to have new one's every week and I love having that goal set. There is three new items in the shop and they are all hand stamped necklaces based on the She Reads Truth soul detox that alot of wonderful bloggers are doing. You can read more about that here.
I wear one of these necklaces everyday and having it around my neck is such a beautiful reminder to myself that I read his word and how much I truly love God.
Small Rectangle She reads truth necklace.
Large rectangle she reads truth necklace.
Circle she reads truth necklace.
That's all for this week!
Have a great day!
Friday, June 8, 2012
Blogging 101 - How to submit a guest post in HTML form
Today I am going to show you how to submit a guest post to someone in HTML form.
It came to my attention that not everyone knows how to do this.
I request posts in HTML form because it is way easier that way & I know alot
of other bloggers do too.
So here is the quick and easy steps on how to do that! :)
One. Write your post as your normally would.
Two. Click on edit HTML After you have your post typed up click on the edit HTML tab found right next to compose.

You will see all of this scary code stuff that is in your post. Don't be alarmed - it's normal. :)

Four. Copy Text

Five. Compose message Go to your e-mail and compose a message.

Six. Paste Paste everything you just copied to the e-mail and put start HTML at the beginning. It helps the person you are sending it to know where it starts.

and to know where it ends. :)

& there you have. That is how you submit a guest post or any post for that matter in HTML form!
Happy Friday!
It came to my attention that not everyone knows how to do this.
I request posts in HTML form because it is way easier that way & I know alot
of other bloggers do too.
So here is the quick and easy steps on how to do that! :)
One. Write your post as your normally would.
Two. Click on edit HTML After you have your post typed up click on the edit HTML tab found right next to compose.
You will see all of this scary code stuff that is in your post. Don't be alarmed - it's normal. :)
Four. Copy Text
Five. Compose message Go to your e-mail and compose a message.
Six. Paste Paste everything you just copied to the e-mail and put start HTML at the beginning. It helps the person you are sending it to know where it starts.
and to know where it ends. :)
& there you have. That is how you submit a guest post or any post for that matter in HTML form!
Happy Friday!
Wednesday, June 6, 2012
Indie Biz 101 - It's all in the brand
I did alot of research on branding yourself & your shop.
I just felt like ccy designs wasn't working for me.
I needed something that described who I was and what I made from the get go.
One of my bloggy bff's Skye & I texted back and forth with ideas.
I must say it was the fastest texting I've ever done in a short amount of time.
But it worked.
I asked her "What about the spontaneous designer?" because it had been bouncing around in my head.
She liked it & said this.
"Full of surprises and wonder. Cassie at the spontaneous designer is constantly coming up with creative items for her shop based on her daily inspiration; faith, family & fun!!"
Um yes!! 100% me. I am not only spontaneous with my shop.
I'm spontaneous with life, so it described me perfect.
Here are a few tips to help you figure out how to brand your business.
1. What are some descriptive words that describe you and what you make? Write them down & keep writing until you run out of words. Then go over them and see what things seem to stand out to you. Circle those, think on it and come back to them.
2. What do you make? This is important. We have to know what we are going to find in your shop. For instance the "designer" part tells you I design things. I design subway art, necklaces, crocheted items. They are all my design & therefor I am a designer as well as the maker. ;)
3. Who buys your items? Granted this can work and not work. I really don't know if an 80 year old woman or a 10 year old girl is going to wonder what in the world spontaneous designing is. But I know people my age will get it. They will get that I am a spontaneous person and that I am constantly coming up with new things for my shop.
4. Think about why you are selling your products. This may seem off track but think about it. Is it a hobby? Do you love what you do? Is it for charity? Is it for extra money? Hobbyin' it up. Love in a basket. Charitable creations. Money making mama. See what I did there? It works.
5. Ask a friend. Brainstorming and throwing ideas back and forth with a friend is almost guaranteed to work. Because you are both going to have different ideas and your friend is going to see your shop differently then you do, she is going to see it how other people see it. Even if you don't come up with a name together, I bet by the end of your conversation you will have one.
Monday, June 4, 2012
New Shop Items {Prints + Crocheted Clutches}
I hope everyone had a great weekend. We soaked up the sun and enjoyed alot of time outside! :)
On this wonderful Monday I have some new shop items to share with you.
This weeks shop update is a couple of new prints & new to the shop crocheted clutches!
There will be more clutches to come but for now let me show you what is in the shop. :)
Multicolored clutch.

This multicolored crocheted clutch will go with so many outfit choices! There is a variety of colors and has a cute little button to close the clutch!
Pink multicolored clutch

This clutch is made with simply soft yard and also has a variety of fun colors!
Yellow clutch

This yellow crocheted clutch will work as a fun bright accessory to add to your outfit!
I am so excited about these crocheted clutches and be on the lookout for more in the future! :)
Now for the two new prints!
Let the world see you shine #2 print digital file

True love subway art digital file

Use code SummerFun to get 15% off on all items except my momma's pretties until Saturday! :)
On this wonderful Monday I have some new shop items to share with you.
This weeks shop update is a couple of new prints & new to the shop crocheted clutches!
There will be more clutches to come but for now let me show you what is in the shop. :)
Multicolored clutch.
This multicolored crocheted clutch will go with so many outfit choices! There is a variety of colors and has a cute little button to close the clutch!
Pink multicolored clutch
This clutch is made with simply soft yard and also has a variety of fun colors!
Yellow clutch
This yellow crocheted clutch will work as a fun bright accessory to add to your outfit!
I am so excited about these crocheted clutches and be on the lookout for more in the future! :)
Now for the two new prints!
Let the world see you shine #2 print digital file

True love subway art digital file

Use code SummerFun to get 15% off on all items except my momma's pretties until Saturday! :)
Subscribe to:
Posts (Atom)